3.0 Manage Flyer
Figure 3.0 below shows the way to Manage Flyer page :

Figure 3.0Figure 3.1 below shows the interface of Manage Flyer :
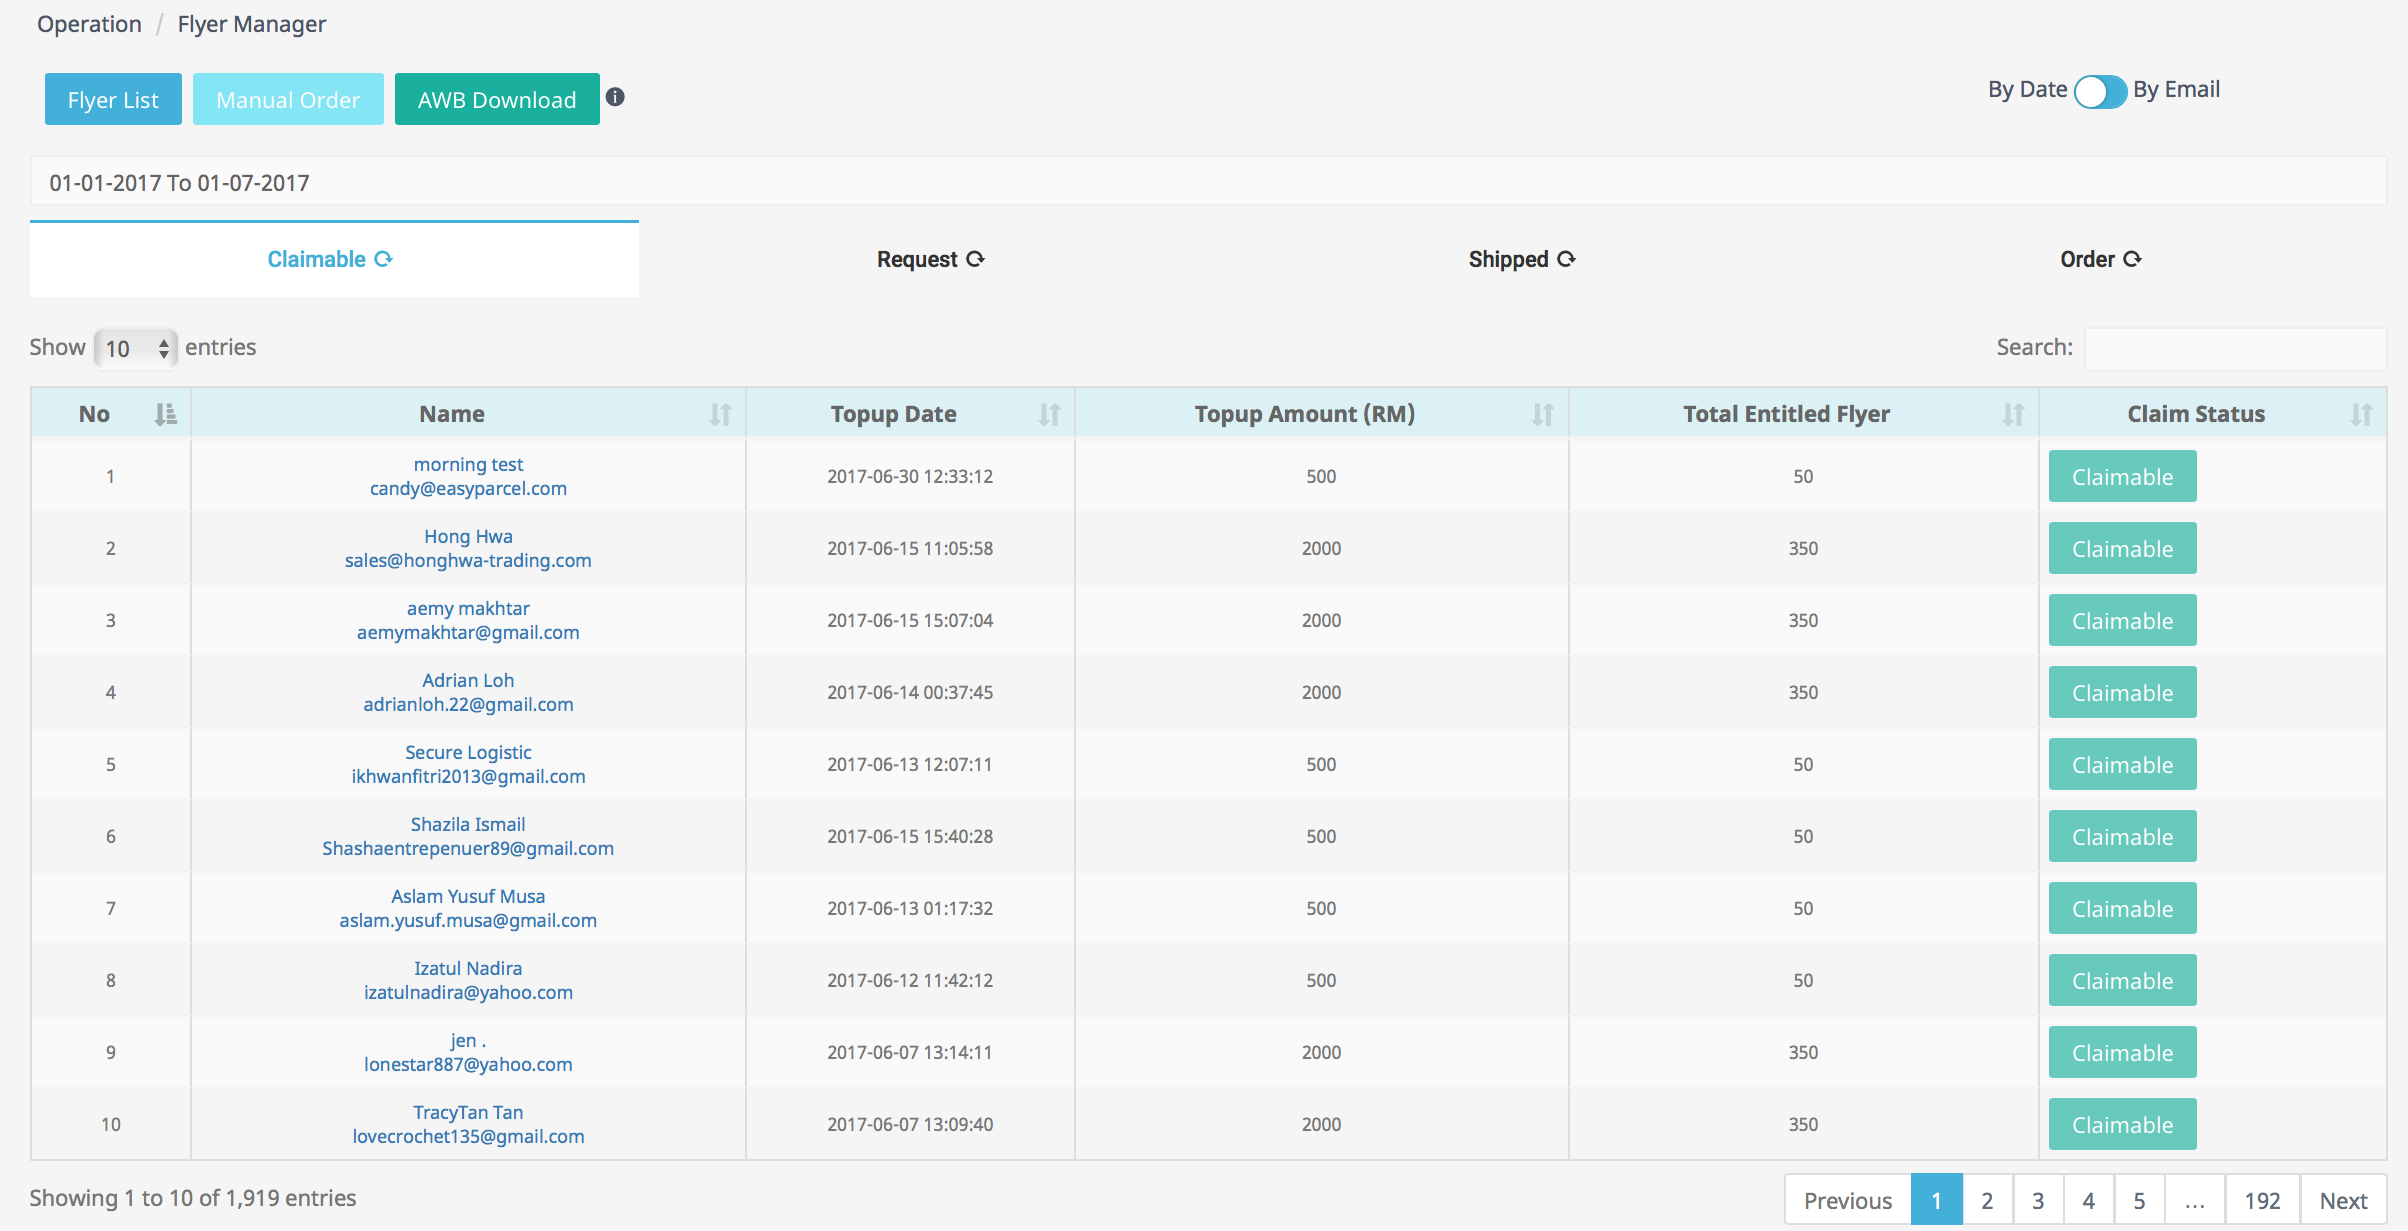
Figure 3.1

Figure 3.2
Based on Figure 3.2 there are 4 tabs included in flyer manager :
Claimable
Request
Shipped
- Order
1. CLAIMABLE
A record of total flyers that can be claimed by topup customer.
Figure 3.3 below shows Claimable interface :
Figure 3.3Admin can search record by entering name, email, topup date, topup amount or total entitled flyer in search bar shown in Figure 3.4 :

Figure 3.4For example based on Figure 3.5, admin wants to search customer by name, they need to enter customer name in the search bar, and the search result will automatically be displayed :

Figure 3.5
2. REQUEST
A record of flyers requested by customer.
Figure 3.6 below shows Request interface :
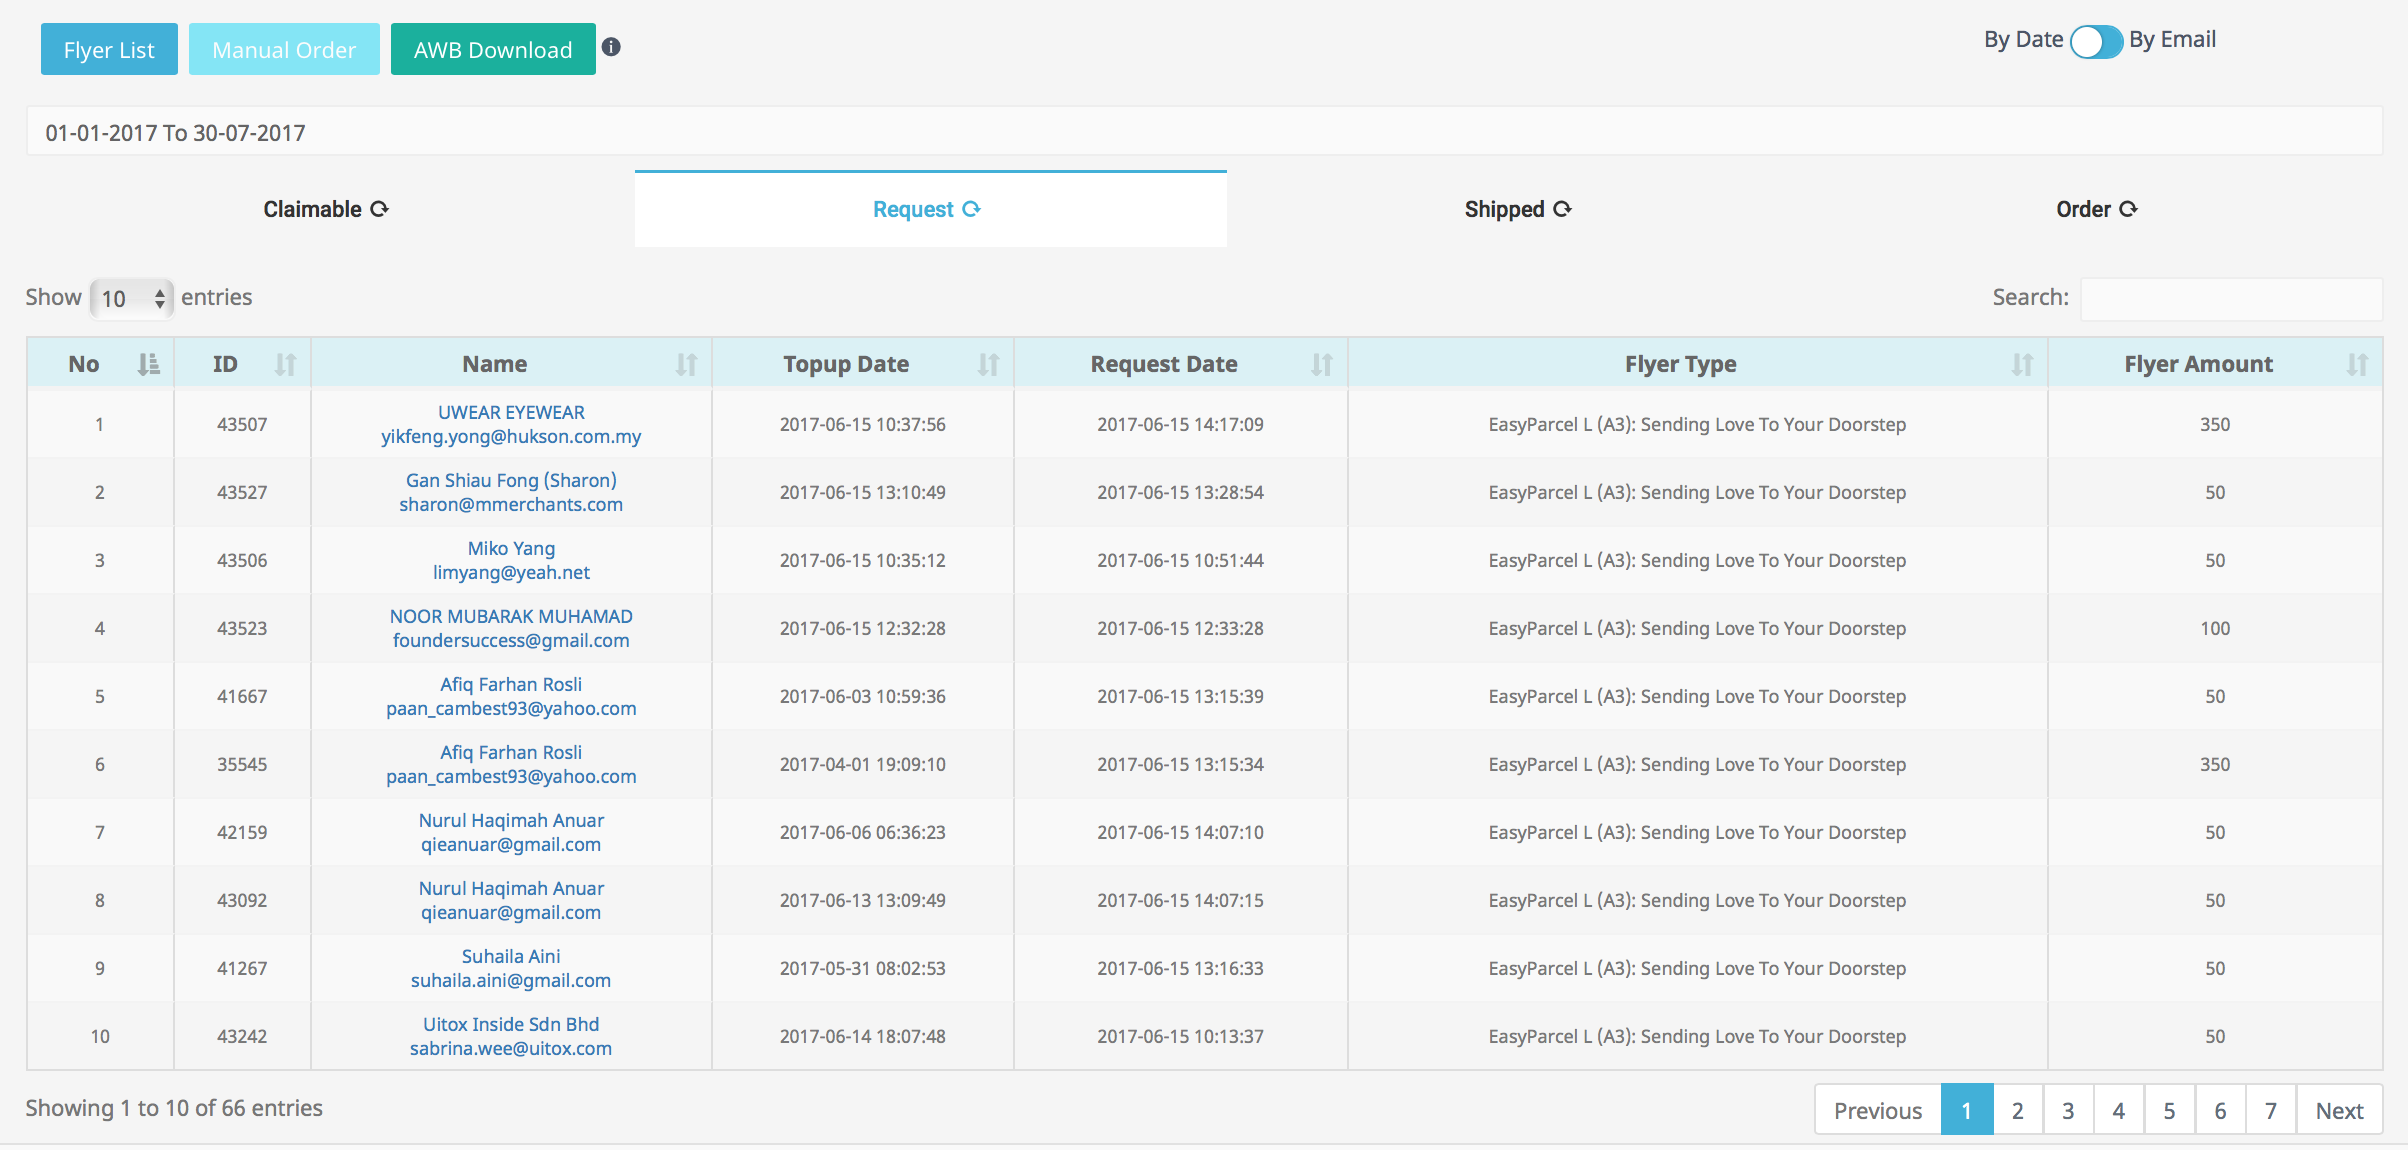
Figure 3.6Admin can search record by entering name, email, topup date, flyer type, or flyer amount in search bar as shown in Figure 3.7 :

Figure 3.7Steps to search customer using search bar is the same as in Claimable tab.
3. SHIPPED
A record of flyers that have been shipped to customer.
Figure 3.8 below shows Shipped interface :
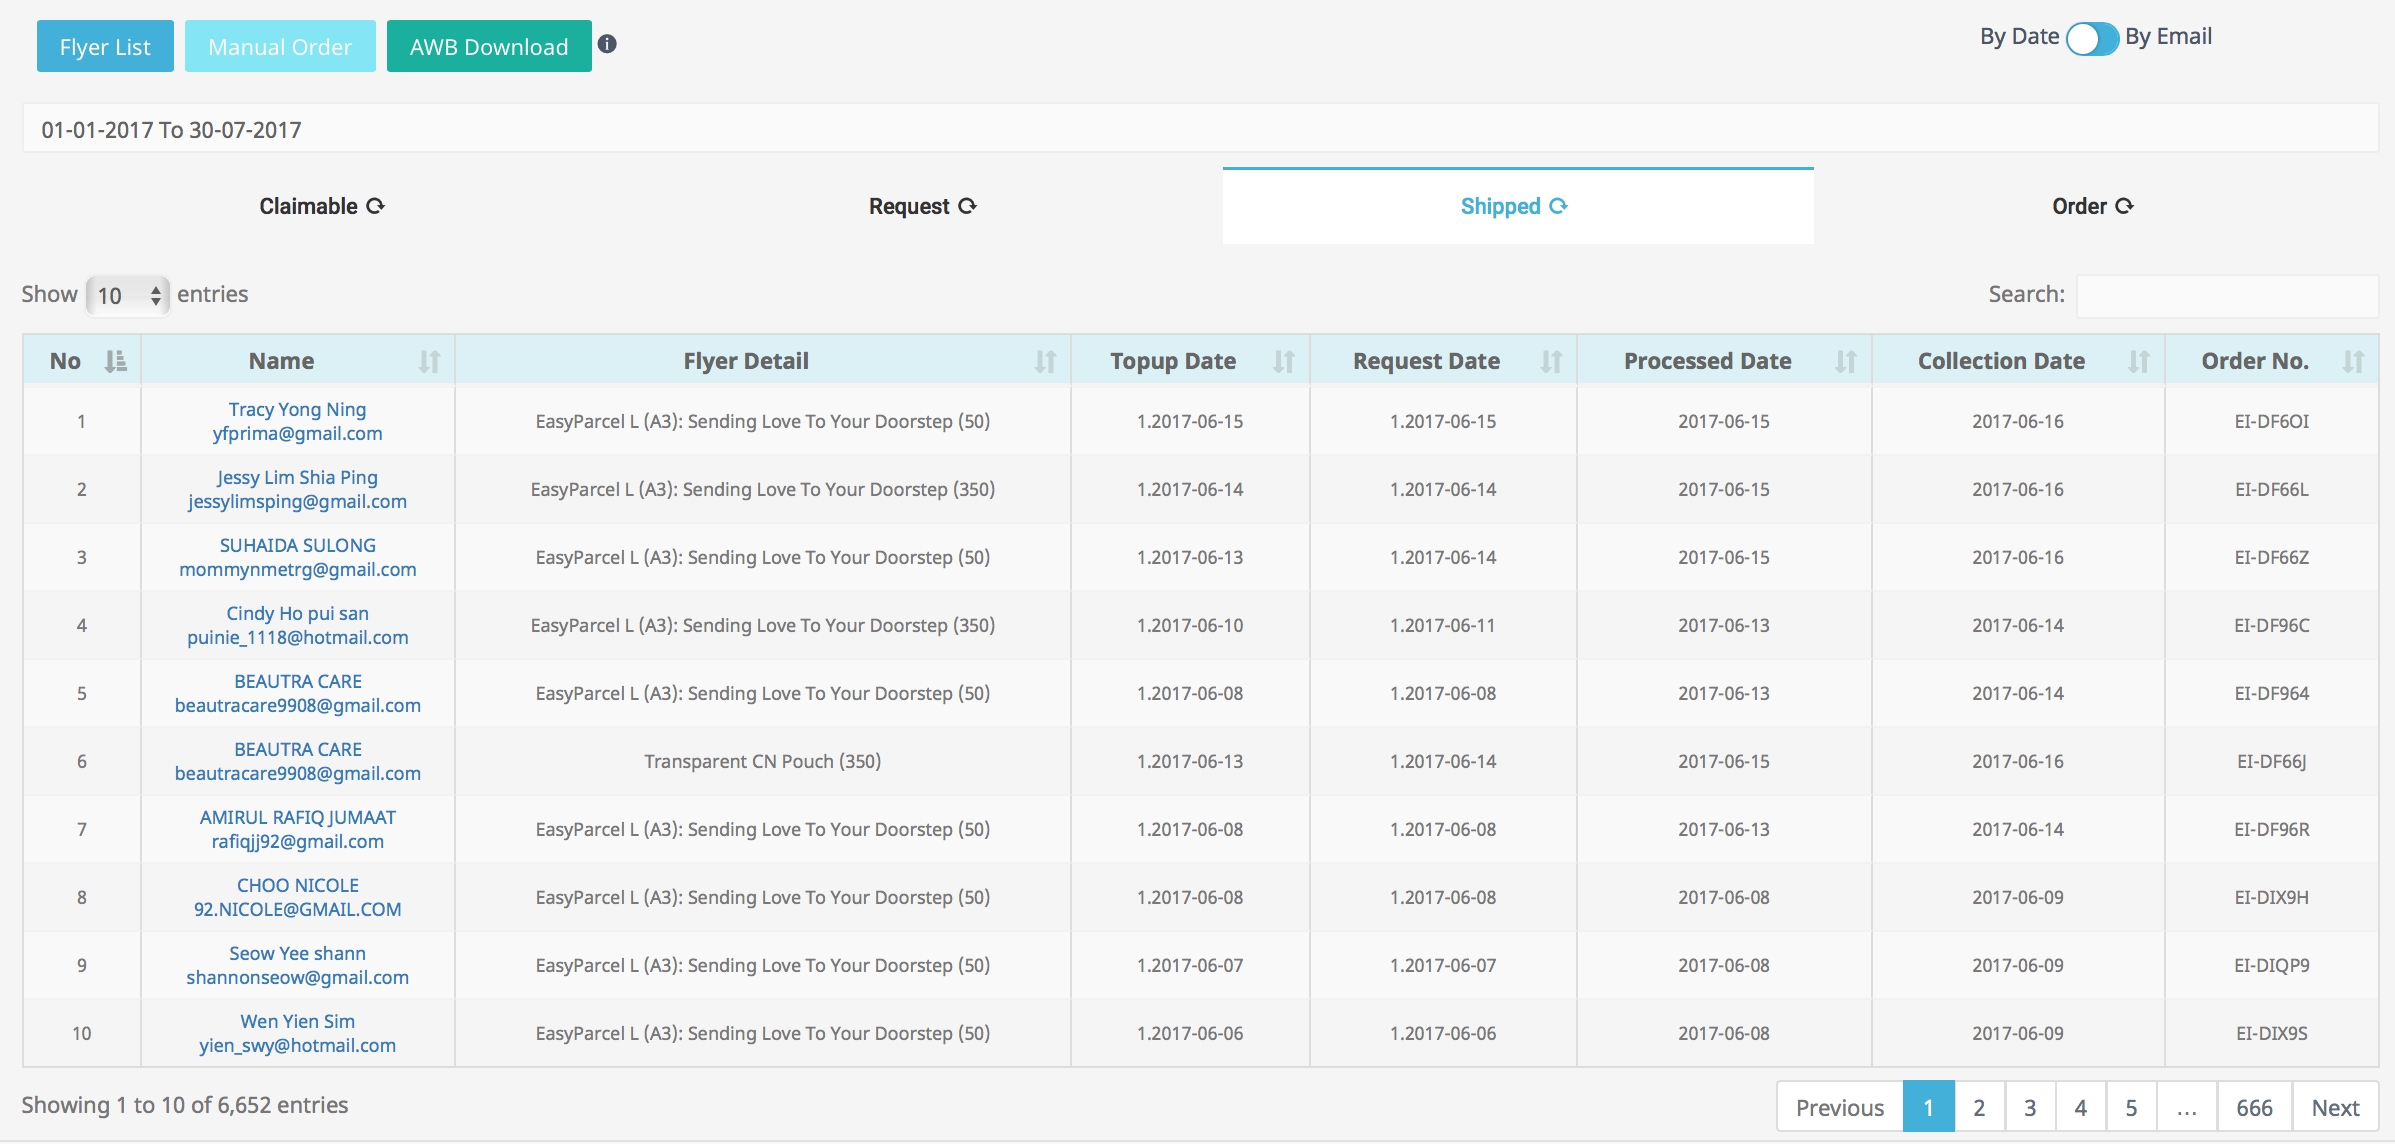
Figure 3.8Admin can search record by entering name, email, date, flyer detail, processed date or order no in search bar as shown in Figure 3.9 :

Figure 3.9Steps to search customer using search bar is the same as in Claimable tab.
4. ORDER
A record of flyers ordered by customer.
Figure 3.10 below shows Order interface :
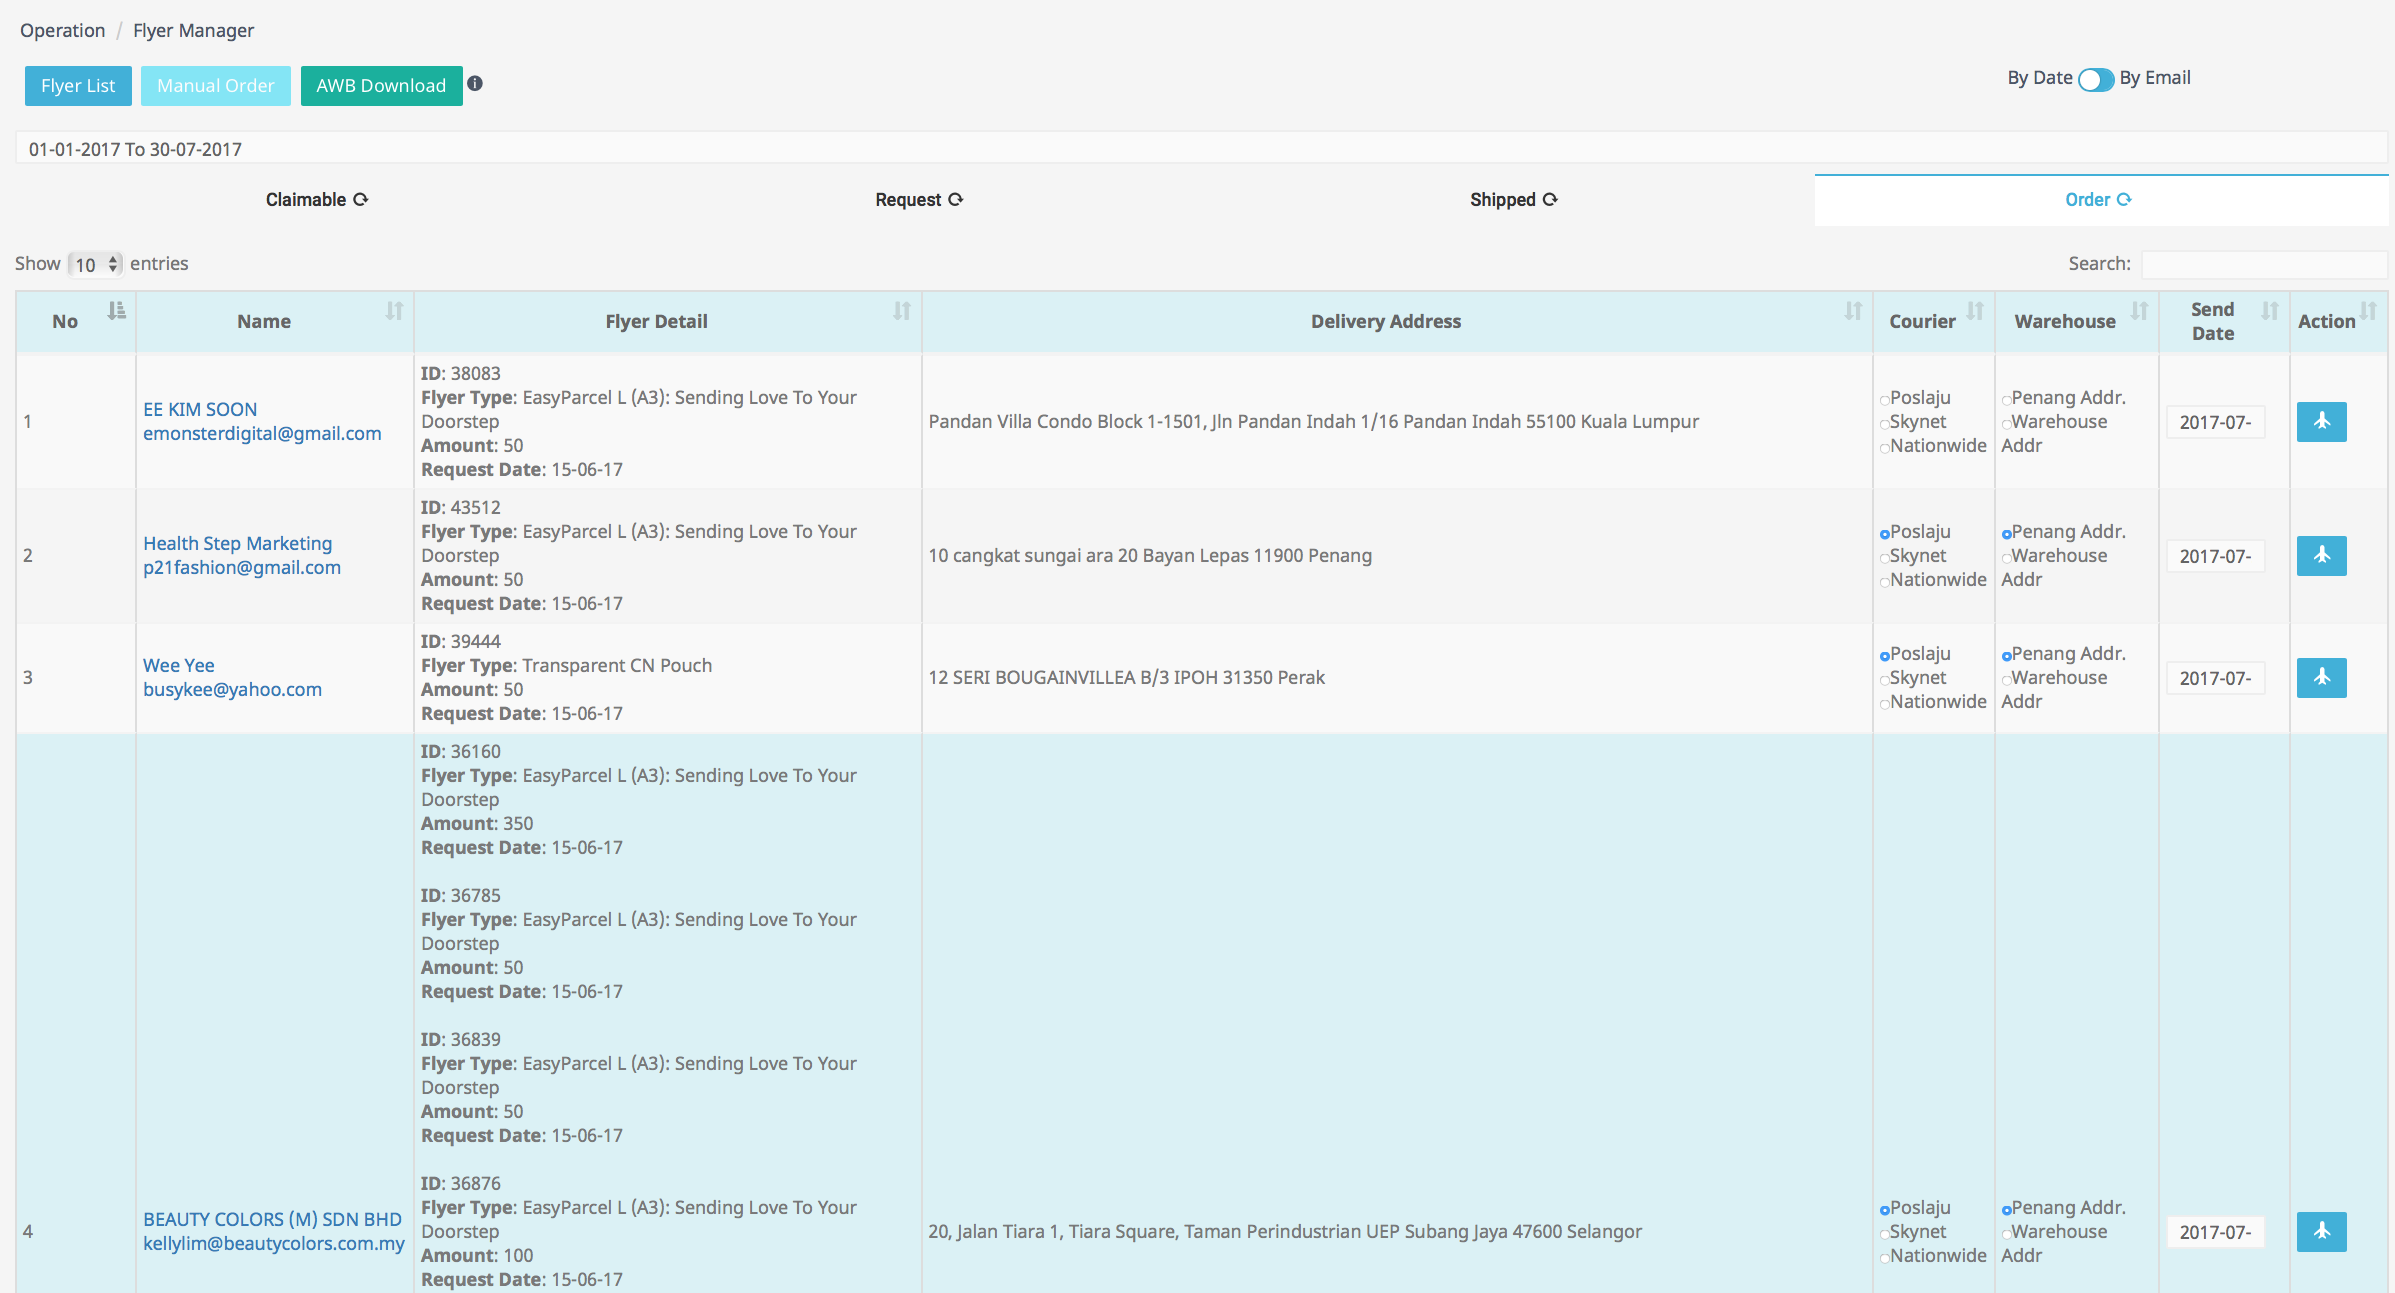
Figure 3.10The blue row indicates that the customer has made multiple flyer requests.
Admin can search record by entering name, email, flyer detail, or delivery address in search bar as shown in Figure 3.11 :

Figure 3.11Steps to search customer using search bar is the same as in Claimable tab.
Admin are able to choose a courier such as Poslaju, Skynet or Nationwide by clicking on the radio button under Courier (in green box Figure 3.12)
Same goes for Warehouse column (in blue box Figure 3.12), admin can choose either Penang Addr or Warehouse Addr
The blue airplane icon(in red circle Figure 3.13) under Action column is to send flyer.

Figure 3.13For example, if admin wants to send flyer to requested customer they just need to click on the blue airplane icon under Action column as shown in Figure 3.13 ;
After clicking the icon, a pop up message will be displayed as shown in Figure 3.14 :

Figure 3.14Based on Figure 3.14 , if click ‘Yes’, the record will be removed from Order list.
Toggle Function
The toggle function on every tab of Manage Flyer is used to search customers record from respective list such as CLAIMABLE, REQUEST, SHIPPED and ORDER.
Based on Figure 3.15, admin can toggle; By Date or By Email.

Figure 3.15Based on Figure 3.16, if admin wish to search claimable record By Date, they can either directly choose from the options given(in blue box) such as today, yesterday, last 7days, ect. or they can enter a custom date(in red box) from the dropdown as shown below :

Figure 3.16Then click the Submit button (green circle Figure 3.16).
To generate search result, admin need to click on tab (in orange circle Figure 3.16).
For example, admin wants to search records in June only. First, make sure it’s toggled By Date and then choose the dates as shown in Figure 3.17 below :
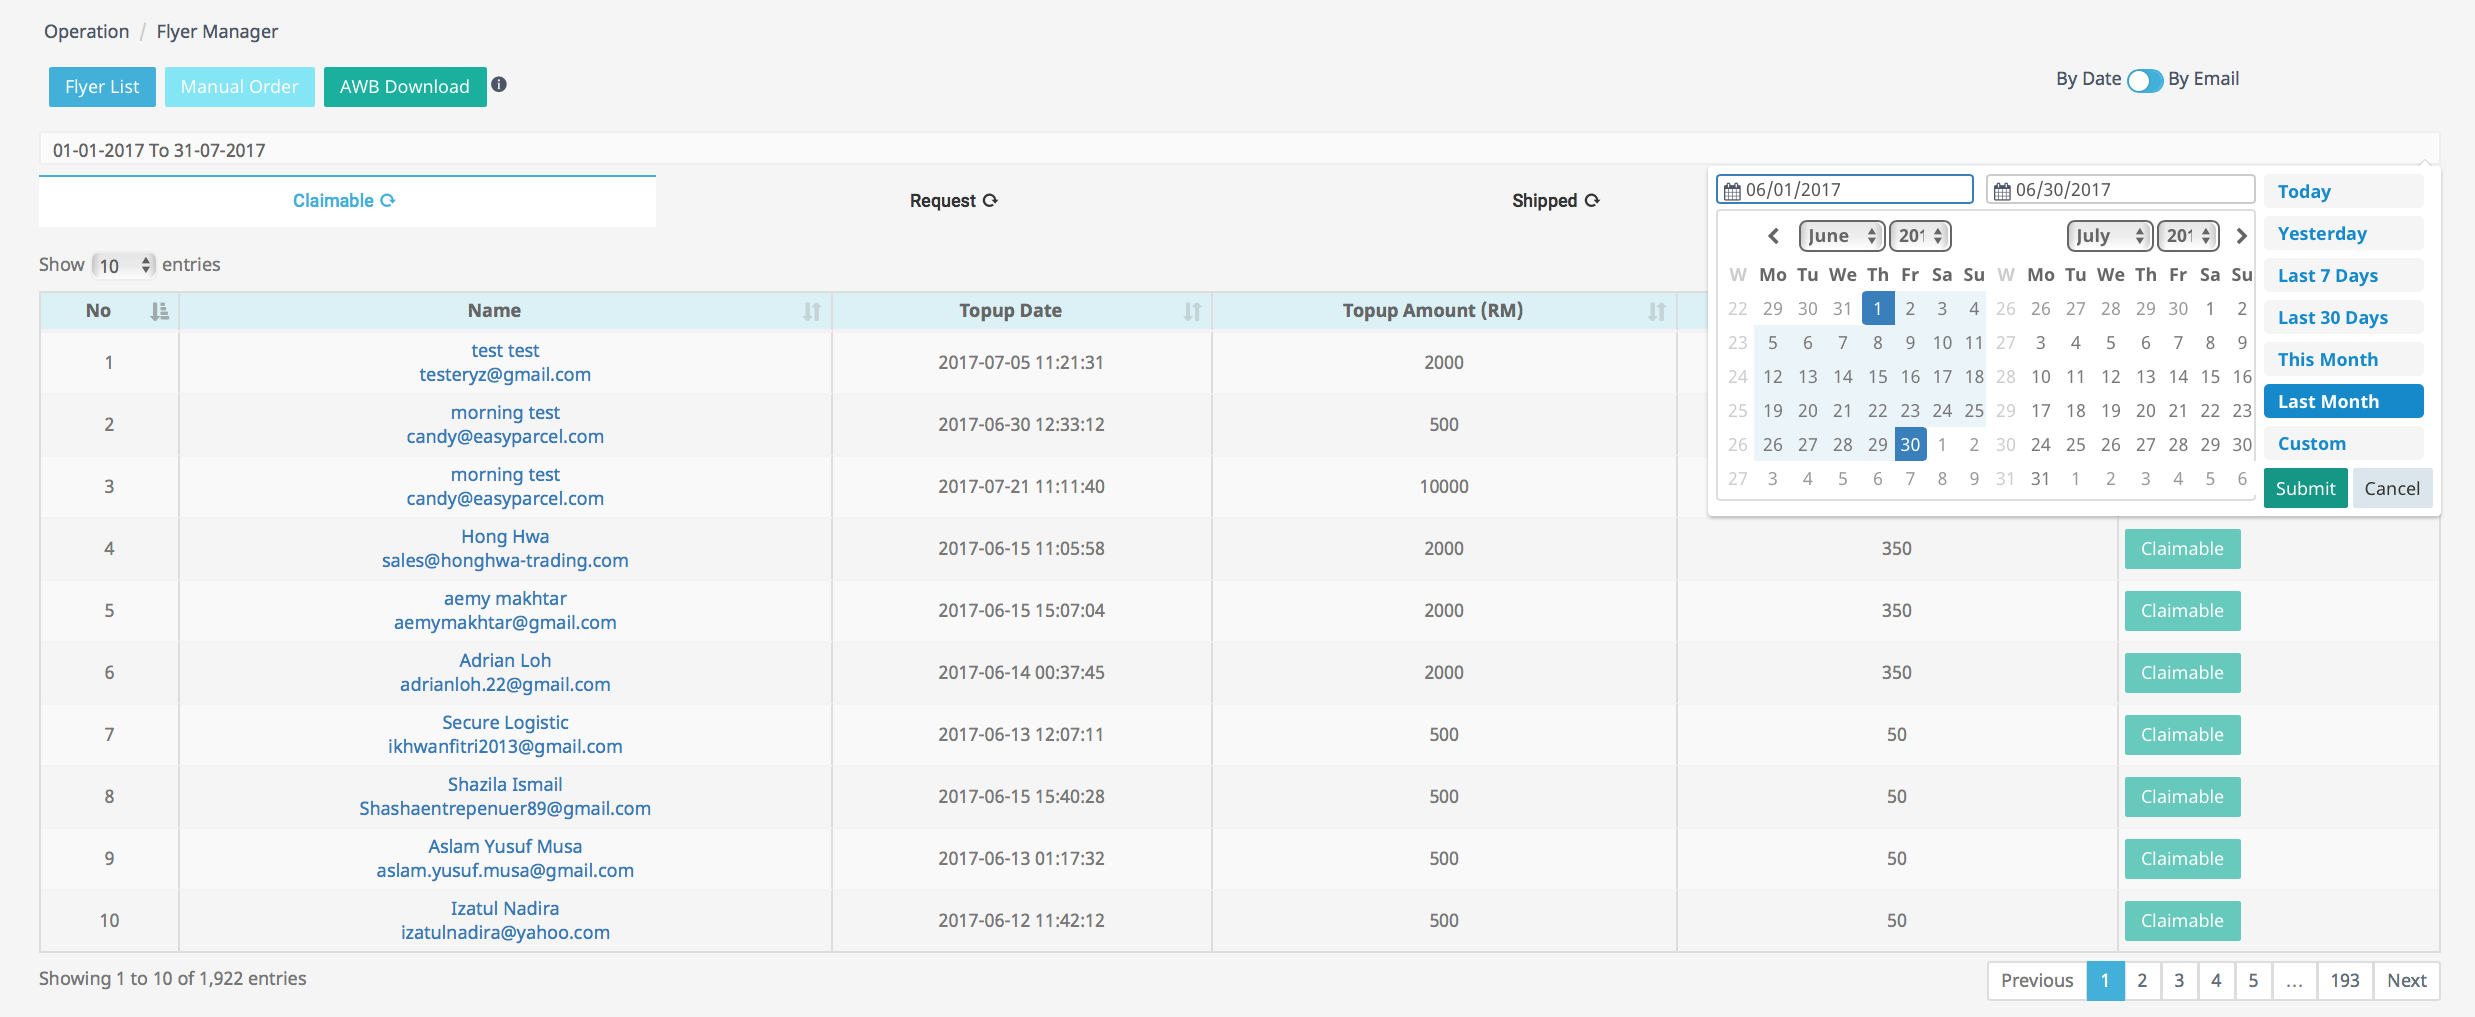
Figure 3.17After clicking the Submit button. Click on Claimable tab highlighted in figure 3.18 to generate result.
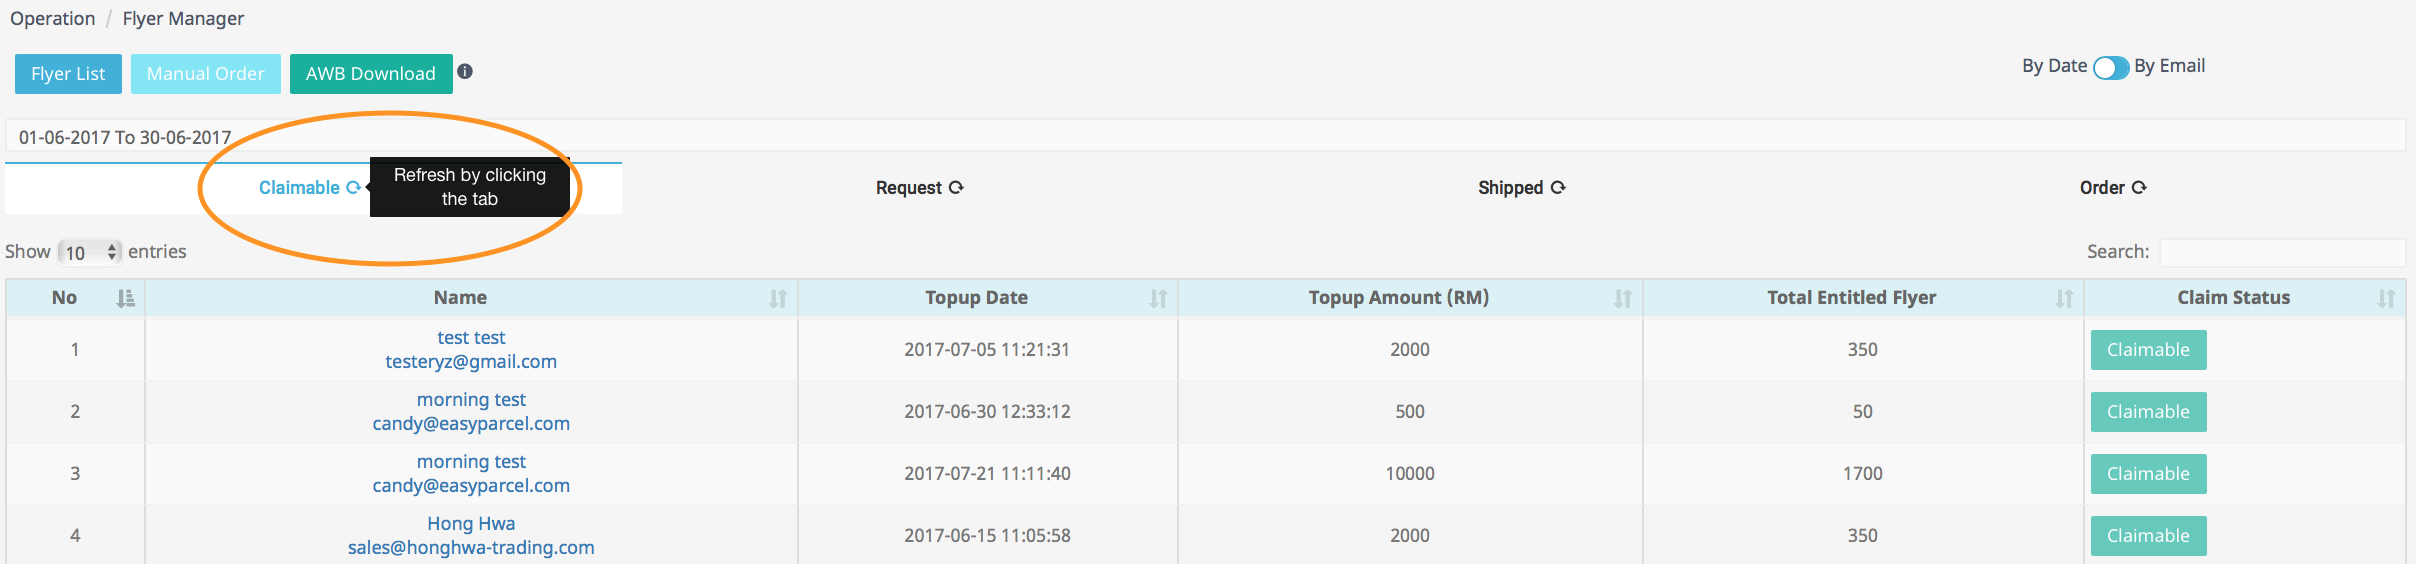
Figure 3.18The search result after clicking Claimable tab is shown in Figure 3.19 :
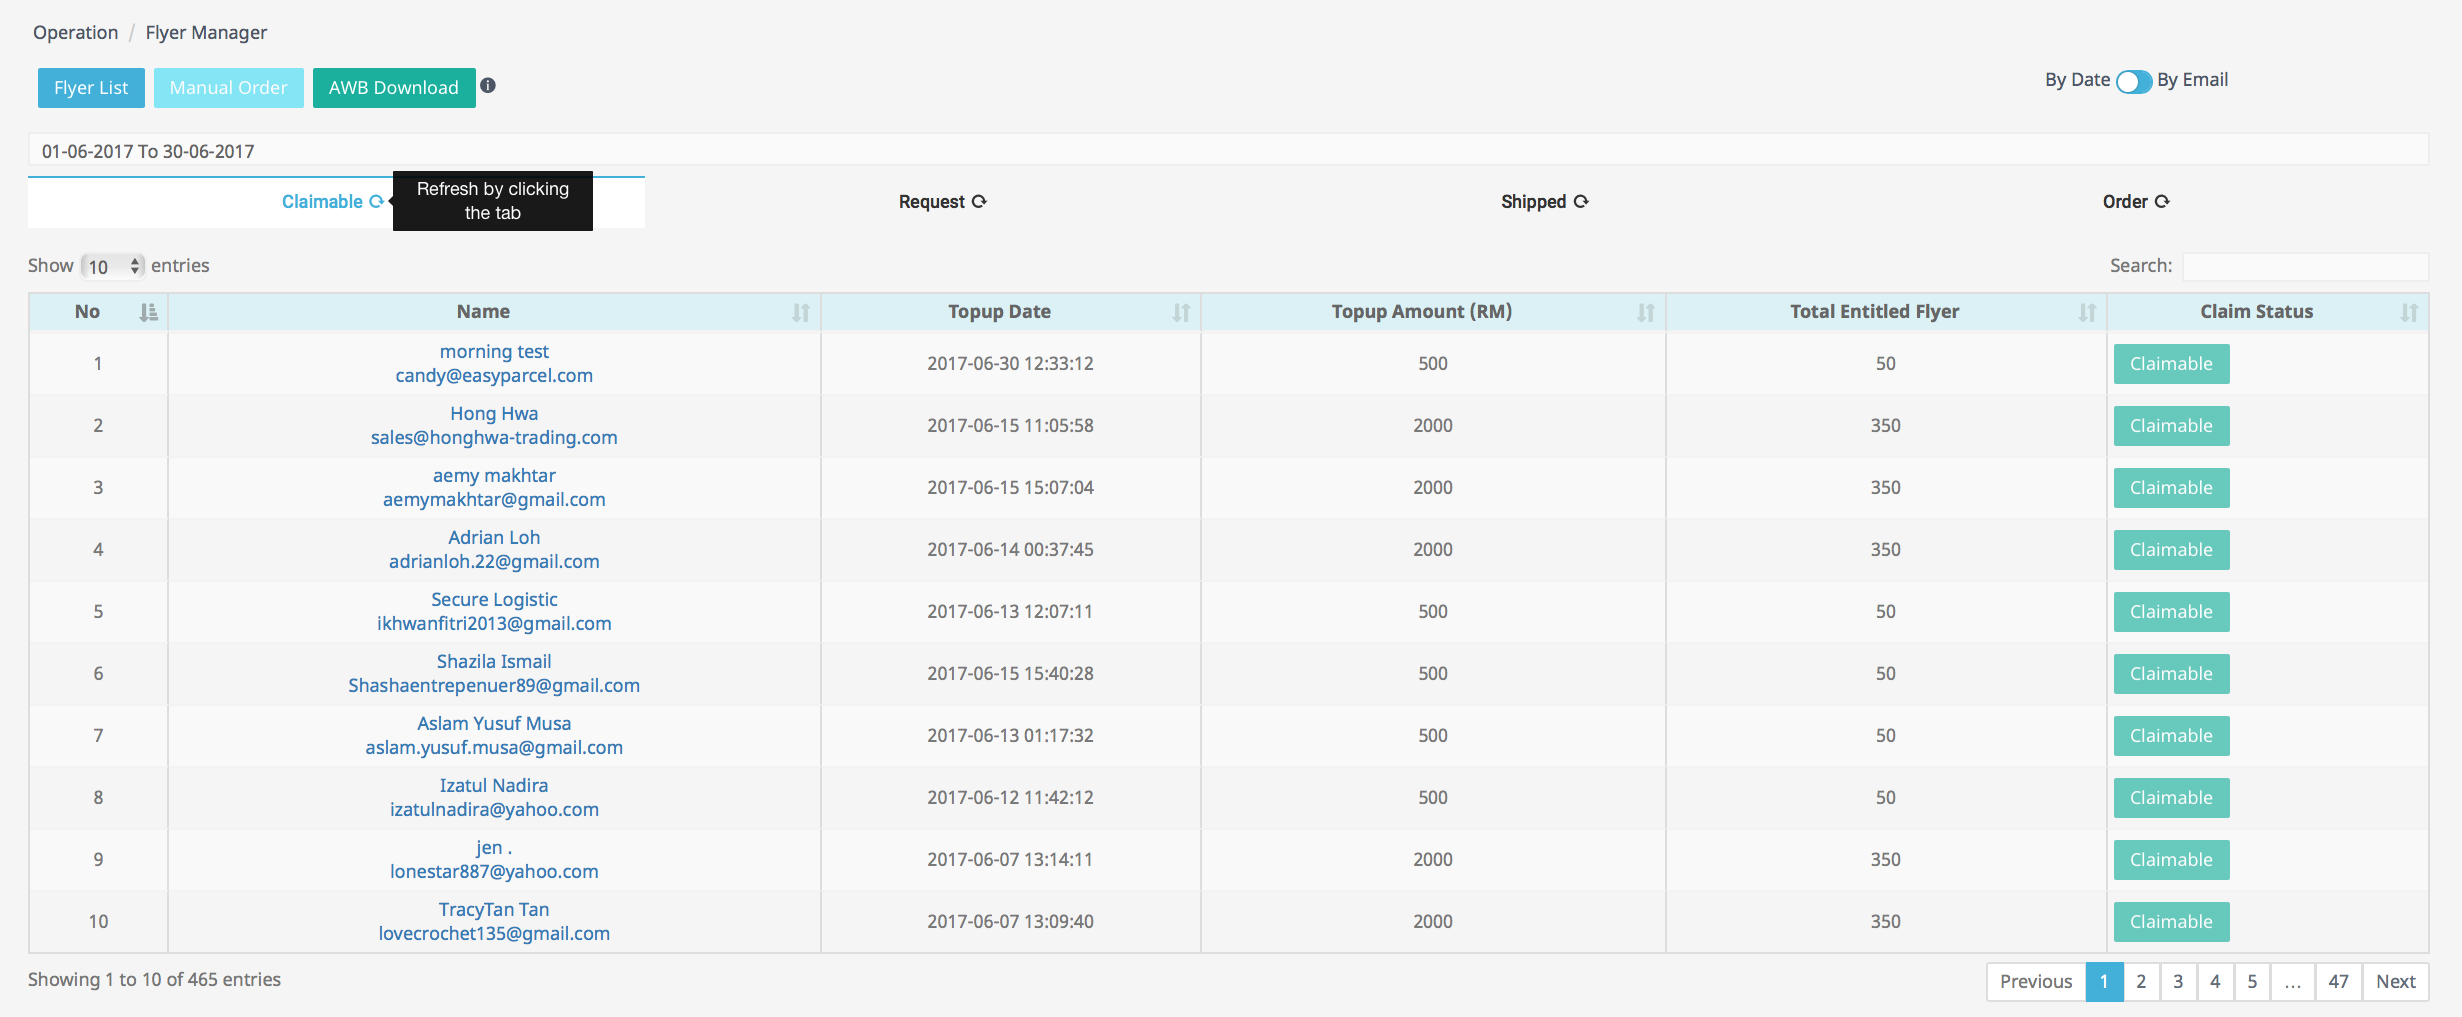
Figure 3.19As for toggle By Email, admin only needs to type in the email they want to search and click the refresh icon to generate the result.
For example, admin wants to search customer By Email , first click the toggle button make sure it is By Email as shown in Figure 3.20 :

Figure 3.20Based on Figure 3.21, enter customer email address in the textbox :

Figure 3.21Click Request tab to refresh(orange circle) , and the search result will be displayed as shown in Figure 3.22 :

Figure 3.22
Flyer List

Figure 3.23
Figure 3.23 shows Flyer List button.
Admin are able to update flyer status and quantity using Flyer List.
Figure 3.24 below shows flyer list when admin clicks Flyer List button :

Figure 3.24Admin can change flyer status from ‘Active’ to ‘Inactive’ or vice versa by clicking on the red icon(In orange circle) under Flyer Status column shown in Figure 3.25 :

Figure 3.25Figure 3.5.9 is an example, admin clicks the red icon to change flyer status :

Figure 3.26After clicking the red icon, admin can see the changes made for Flyer Status to from “Active” to “Inactive” :

Figure 3.27Based on Figure 3.6, admin can directly enter the balance amount of a flyer in the textbox (in blue box) under Flyer Balance column;
and then add or minus flyer balance by clicking on (+) or (-) icons in red box in [Figure 3.28 .

Figure 3.28Figure 3.29 shows an example, if admin wants to add flyer balance to Poslaju (B5) which currently have 50 flyer balance(in orange box), so firstly admin need to type in the amount that wants to be added in the texbox under Flyer Balance(in red box) :

Figure 3.29Click the blue (+) icon, and the 300 is added to existing 50 flyer balance, which totals up to 350 flyer balance as shown in Figure 3.30 :

Figure 3.30The steps to reducing flyer balance is the same as adding, but by clicking the blue (-) icon.
Manual Order
Figure 3.31 shows Manual Order button :
Figure 3.31Admin are able to manually order flyer.
If admin clicks on Manual Order button as in Figure 3.31, a Manual Order Form will be prompted as shown in Figure 3.32 :

Figure 3.32Based on Figure 3.32, the steps to make manual order is to fill in the following details :
- 1.Request ID
- 2.Requester Email
3.Flyer Type : *admin have to choose one option from the dropdown list shown in Figure 3.33*

Figure 3.334.Flyer Amount 5.Order Number 6.click the Submit button
Figure 3.34 is an example to manually order flyer :

Figure 3.34Click on Submit button, a confirmation popup message will appear as shown in Figure 3.35 :

Figure 3.35Based on Figure 3.35, if click Yes, the submission will be placed under Order tab.